Categories
Architecture Java EE MicroProfile

MicroProfile support in Java EE Application servers

Introduction

With Java EE, you can create enterprise-type application quickly as you can concentrate on implementing the business logic.
You are also able to create applications which are more micro-service oriented, but some handy ‘features’ are not yet standardised. Standardisation is a process of specifying the best practices which of course takes some time to discover and validate these best practices.

The MicroProfile group wants to create standards for those micro-services concepts which are not yet available in Java EE. Their motto is

Optimising Enterprise Java for a micro-services architecture

This ensures that each application server, following these specifications, is compatible, just like Java EE itself. And it prepares the introduction of these specifications into Java EE, now Jakarta EE under the governance of the Eclipse Foundation.

Specification

There are already quite some specifications available under the MicroProfile flag. Have a look at the MicroProfile site and learn more about them over there.

The topics range from Configuration, Security (JWT tokens), Operations (Metric, Health, Tracing), resilience (Fault tolerance), documentation (OpenApi docu), etc …

Implementations

Just as with Java EE, there are different implementations available for each spec. The difference is that there is no Reference Implementation (RI), the special implementation which goes together with the specification documents.
All implementations are equally.

You can find standalone implementations for all specs within the SmallRye umbrella project or at Apache (mostly defined under the Apache Geronimo umbrella)

There exists also specific ‘server’ implementations which are specifically written for MicroProfile. Mostly based on Jetty or Netty, all implementations are added to have a compatible server.
Examples are KumuluzEE, Hammock, Launcher, Thorntail (v4 version) and Helidon for example.

But implementations are also made available within Java EE servers which brings both worlds tightly integrated. Examples are Payara and OpenLiberty but more servers are following this path like WildfFly and TomEE.

Using MicroProfile in Stock Java EE Servers

When you have your large legacy application which still needs to be maintained, you can also add the MicroProfile implementations to the server and benefits from their features.

It can be the first step in taking out parts of your large monolith and place it in a separate micro-service. When your package structure is already defined quite well, the separation can be done relatively easily and without the need to rewrite your application.

Although adding individual MicroProfile applications to the server is not always successful due to the usage of the advanced CDI features in MicroProfile implementations. To try things out, take one of the standalone implementations from SmallRye or Apache (Geronimo) – Config is the probably easiest to test, add it to the lib folder of your application server.

Dedicated Java EE Servers

There is also the much easier way to try out the combination which is choosing a certified Java server which has already all the MicroProfile implementations on board. Examples today are Payara and OpenLiberty. But also other vendors are going this way as the integration has started for WildLy and TomEE.

Since the integration part is already done, you can just start using them. Just add the MicroProfile Maven bom to your pom file and you are ready to go.

<dependency>
   <groupId>org.eclipse.microprofile</groupId>
   <artifactId>microprofile</artifactId>
   <version>2.0.1</version>
   <type>pom</type>
   <scope>provided</scope>
</dependency>

This way, you can define how much Java EE or MicroProfile stuff you want to use within your application and can achieve the gradual migration from existing Java EE legacy applications to a more micro-service alike version.

In addition, there exists also maven plugins to convert your application to an uber executable jar or you can run your WAR file also using the hollow jar technique with Payara Micro for example.

Conclusion

With the inclusion of the MicroProfile implementations into servers like Payara and OpenLiberty, you can enjoy the features of that framework in your Java EE Application server which you are already familiar with.

It allows you to make use of these features when you need them and create even more micro-service alike applications and make a start of the decomposition of your legacy application into smaller parts if you feel the need for this.

Enjoy it.

Categories
Atbash Overview

Atbash repositories overview

Now that I’m working a bit more than 6 months on the Atbash repositories, it is time to give you some overview of them.

For the moment, almost all of them are geared towards Java EE 7 and Java 7.

The idea is to create a MicroProfile compatible experience on Java EE 7. As much as possible of course. Since MicroProfile is based on Java 8, it is not always easy (or possible) to have an identical experience.

But the idea is to give the developers the possibility to have a “smooth” migration from Java EE 7 to MicroProfile by having all or the most important specifications, available on those servers.

Utility repository

Github

This contains some code used in multiple other Atbash repositories. It is not directly related to the goal but can have some usages in any project.

utils-se

– BASE64 encoder and decoder
– Utility class related to searching classes and resources on different class loaders (Current Thread, class loader of utility class or System class loader) and instantiating classes with advanced argument matching.
– Reading library or framework version from manifest file
– Check to see if an application is running within a CDI container
– Utilities related to verification and handling proxies (like determining original class)

– Reflection utilities useable in unit testing (so that we can read and set private properties without the need for setters and getters which would only be needed for testing)

utils-cdi

– Programmatic retrieval of CDI Beans, also for an optional bean (bean defined by Producer method which may or may not be present)
– Retrieval of a bean defined by Producer method involving generic types (issue due to type erasure)

– Fake bean manager useable within unit tests to supply some Mock Cdi bean instances when using programmatic CDI bean retrieval.

utils-jsf

– Creating a method expression based on the expression value
– Retrieving property values from JSF components (taking into account expressions and static values)
– Custom component finding which starts at the parent itself but then extends to the parent until found or view root is reached.

Atbash JSON (Java SE)

GitHub

Alternative JSON-B implementation (not following the specs!) to convert Java instances to JSON and vice versa. The code is adapted from the JSON smart framework (no longer maintained) for the use cases within Atbash (see Atbash JWT support) and extended to have customizations.

JWT Support (Java SE + CDI)

GitHub

The code in this repository is to support JWT (JSON Web Token, signed but also encrypted) as they appear in protocols like OAuth2 and OpenId Connect.

To support this encoding and decoding, there is also a unified handling of cryptographic keys. It is capable of reading them from a PEM file, a Java Keystore, a JWK and a JWKSet. Various encrypted formats for the Private Key are supported.

But the idea goes a bit further than just support OpenId Connect JWTs. Instead of exchanging data as JSON, why not exchange them as JWT. That way, we are not only transferring information but also make some guarantees like sender verification and end to end protection as we can detect changes through the signing.

Atbash Config (Java SE + CDI)

GitHub

The Atbash config is a Java 7 port of the MicroProfile Config specification and the Apache Geronimo implementation.

But there are also some extensions created like
– Support for custom named configuration files.
– Support for Stages so that based on a system property, values can be overridden in environments like Test environment.
– Support for custom formatted date values
– Logging of configuration values at startup of the application.
– Support for YAML format.

There is also a Config provider for testing available where the configuration values are stored in a HashMap.

Atbash Config server (MicroProfile Product)

GitHub

Allows defining the configuration values for MicroProfile application in a central place. These applications can retrieve the values using a JAX-RS endpoint.

There is also a client implementation available which, when added to the application, retrieves the values automatically, based on the configured endpoint of the config server.

Jerry (JSF)

GitHub

Jerry defines a JSF Renderer interceptor which allows you to perform various tasks on any JSF component.

It is the basis for a more advanced validation mechanism for JSF and the declarative security features of Octopus for JSF components.

Valerie (JSF, Bean Validation)

GitHub

Using the interceptor mechanism of Jerry, Valerie places the validation constraints of the Java properties (like not null, length etc) automatically on the JSF components it uses.
This way it allows to have the visual aspects of these constraints on the JSF component HTML representation and JSF validation without the need to put these constraints as JSF attribute values.

Octopus (Java SE, Java FX, CDI, JSF, JAX-RS)

GitHub

Octopus is a large framework consisting of small artifacts that bring you every aspect of authentication and authorization for Java EE and MicroProfile applications.

  • Permission-based framework
  • Secures URL, JSF components, and CDI and EJB method calls
  • Support for Java SE, JavaFX, JAX-RS and JSF
  • Integrates with OAuth2, OpenId Connect, LDAP, database, JWT, KeyCloak, CAS, …
  • Custom OpenId Connect solution within a microservices environment
  • Compatible with (and using) Microprofile (Config, Rest Client, MP-JWT, …), Java EE Security API, …
  • Very flexible, can be easily integrated within your application
  • Tightly integrated with CDI
  • Type-safe definition of permissions
  • Declarative declaration of JSF security (with tags, not using rendered attribute)
  • A custom voter can be created for more complex security requirements

Dependencies overview

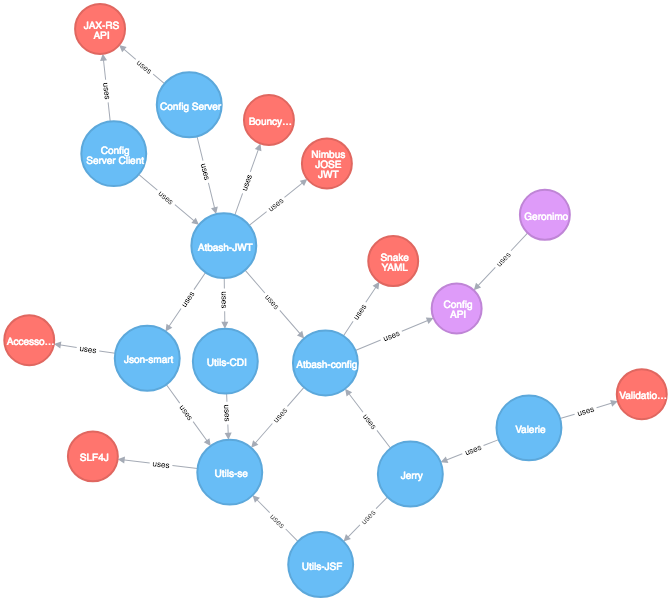
The following Neo4J graph gives you an overview of the dependencies between these repositories and the relation with other libraries. Octopus is left out of the image because it would complicate it too much.

Have fun

Categories
Project setup

Generating (Maven) Projects

Introduction

The first thing we do when starting a new application is setting up our project. A lot of people use Maven for this, and you have various options how you can do this.
Since I create a lot of projects for testing out various features of the Atbash projects or for trying things out (I have around 300 projects on my computer today) I was searching for some help to do this.

Application setup

When trying things out, I need to have some minimal project setup. Not only do I need the Maven pom file with the required dependencies, I also need some files like configuration or a login file for Octopus.

I do not need to have tools to generate me the JPA entities, JSF Screens or JAX-RS endpoints. Creating a few of them is not difficult with the current IDE’s and that automatic generation is mostly too opinionated so that it is not usable in production systems either.

So what are the options to have this minimal project setup

Copy and Paste

You can always copy such a minimal project you have already created and made some modifications to

  • Change the groupId and artifactId of the pom file
  • Update the dependencies
  • Update the configuration file to match your new dependencies and use case you want to test out.
  • Change the java package with your java code
  • Add or remove code depending on the feature for this use case.

This is a valid procedure and in most cases the most efficient one. You don’t need to learn any new tool, extend it with your features (Like Octopus in my case) but of course, it is not the most fun way of doing things.

JBoss Forge

JBoss Forge https://forge.jboss.org/ is a tool specifically designed to get your application up and running fast. It not only generates the project for you but also can help you in generating those well-structured classes like JPA entities, JAX-RS endpoints, and screens with JSF or Angular(JS).

I used it in the past and it can be a valuable tool but it is not the right thing for what I want.
Although you can generate your maven project, you need a script and/or a custom add-on for the features that I want (specific dependencies within the pom.xml file and some configuration and java files)

It also has a lot of options to generate code for you, but again this is sometimes opinionated and not what you or your company wants to use.

Other tools

Since there are various other tools on the internet, the topic seems to be important for a lot of people. Similar tools which I found are generjee and factorEE.
Not all of them are maintained anymore or do focus on the wrong things (for my use case) like generating code.
I also find a CLI very important in this case since it allows you to create an application very rapidly (and recreate it based on the same configuration)

Jessie

So, due to the lack of the right tool for me, I created one of my own called Jessie (Java EE Start project as it was geared at that time towards Java EE). Last year with the release of CDI 2.0, I did a rewrite of it using the Java SE CDI container and included the usage of ThymeLeaf as templating mechanism so that it became easier to generate files which can be customized.

In the OpenSource spirit of Atbash, I placed the code on Github  and created a front end for it.
You can play with it on the OpenShift V3 instance  or can download the code that just needs a few parameters within a YAML config file and the CLI version generates your project.

The first version has support for Java EE and additional frameworks like DeltaSpike, PrimeFaces, and Octopus, the security framework.

Since I’m also involved with MicroProfile lately, a version for MicroProfile and the support for the different vendor implementation like LibertyIO, WildFly Swarm, Payara Micro etc will be created later on.

Conclusion

When setting up a new project, the most efficient solution is creating it from scratch or start from a similar existing project and make the required adaptations.
Another useful tool is JBoss Forge, mainly when you are interested in generating some code.

Jessie has been created a few years ago as a toy and now available on GitHub and it was a good learning opportunity for CDI 2.0, templating with ThymeLeaf and creating a tool which runs in multiple environments (CLI, Java FX, Web/JSF)

Maybe it is also helpful for you.

Have fun.

Categories
JAX-RS Security

Http Signatures for End-To-End protection

Introduction

In a distributed system, it is not enough to know who called you, but you also need to make sure the data which you receive are not altered in transit.
The use of tokens (like Bearer JWT tokens according to the OpenId Connect or MicroProfile JWT Auth specifications) can be captured and briefly used to send fake request to your endpoints.
And SSL (like using HTTPS connections) cannot guarantee that your message isn’t read or altered by someone due to the possibilities of SSL Proxy termination or even Man In The Middle Intermediates who fakes correct SSL.

Encryption or protection

The solution is that your processes somehow make sure that the communication between them is ‘safe’. If the processes themselves (your client and your server application) perform these tasks and not some network layer (SSL, in fact, doesn’t fit in any OSI based network layer) of your (virtual) machine.

When your process is performing these tasks, it is possible to create a security context between the 2 processes and then each process can ensure or detect that the message is unaltered or can’t be read, regardless of any Proxy or Man In The Middle.

Whether you need encryption of the message (because you have confidential data) or signing (sensitive data) depends on the data. But at least you need the signing of the message so that we can guarantee the message is actually sent by someone we trust and isn’t altered.

Http Signatures

There is a standard created to have a mechanism to implement this kind of End To End Protection. It is called ‘HTTP Signatures’ and designed by the IETF. https://tools.ietf.org/id/draft-cavage-http-signatures-09.html

It is very HTTP friendly as it adds an additional header to the request. Within this header, enough information is placed so that the target process can verify if the message was altered or not.

This header is called Signature

Signature : keyId="rsa-key-1",algorithm="rsa-sha256",headers="(request-target) date digest content-length",signature="Base64(RSA-SHA256(signing string))"

The specification defines the structure and framework how the header should be created and the verification process must be performed but leaves a lot of freedom to the developer to tailor this protection to his/her needs.

The idea is that there is a signature calculated based on some parameters which are mostly just other headers. And by calculating them on the receiving side, we can verify if these values are changed.

These parameters are described within the headers parameter, and in the example, the following headers are used (request-target) date digest content-length

The values of these headers are concatenated (there exist a few rules about how to do it) and for this string, the cryptographic hash is calculated the signature.
The calculation is done using the value specified by the algorithm parameter (rsa-sha256 in our example above) and from the key with id rsa-key-1 is used for this in our example.
There are a number of crypto algorithms allowed, but RSA keys are the most popular ones.
This signature value is a binary, so a BASE64 encoded value is placed within the header.

In theory, all headers can be used but some of them are more interesting than other ones.
For example

  • (request-target) is a pseudo header value containing the concatenation of the http method and the path of the URL. If you like to include also the hostname (which can be interesting if you want to make sure that a request for the test environments never hits production, you can add the host header in the set of headers which needs to be used for the calculation of the signature value.
  • date header contains the timestamp when the request is created. This allows is to reject ‘old’ requests.
  • digest is very interesting when there is a payload send to the endpoint (like with put and post). This header contains then the hash value of the payload and is a key point in the end to end protection we are discussing here.

On the receiving side, the headers which are specified within the signature parameter are checked. Like

  • date is verified to be within a skew value from the system time
  • digest is verified to see if the header value is the same as the calculated hash value from the payload.

And of course, the signature is verified. Here we decode the signature value with the public key defined in the keyId parameter, using the algorithm specified.
And that value should match the calculated value from the headers.

Using Http Signatures

I have created a Proof Of Concept how this can be integrated with JAX-RS, client and server side.

For the server side, it is quite simple since you can add filters and interceptors easily by annotating them with @Provider. By just then indicating if this interceptor and filters should need to do their work, verification of the HTTP Signature, you are set to go.

@Path("/order")
@RestSignatureCheck
public class OrderController {

On the client side, you can register the required filters and WriterInterceptor manually with the Client. Something like this

Client client = ClientBuilder.newClient();
client.register(SignatureClientRequestFilter.class);
client.register(SignatureWriterInterceptor.class);

One thing is on the roadmap is to integrate it with the MicroProfile Rest Client way of working so that you can register the Signatures Feature and you’re done.

The initial code can be found on Github.

Conclusion

With the Http Signatures specification, you can add a header which can be used to verify if the message is changed or not. This is a nice non-intrusive way of having an End-To-End protection implement which can complement the SSL features to be sure that no intermediary party changes the message.

Have fun.

Categories
JSF

A renderer interceptor concept for Java ServerFaces

Introduction

A renderer is an important concept within JSF. It is responsible for creating the HTML output of a page from the Component tree but also processing the response from the browser is their responsibility.

It takes the values from the attributes of a component to do their job. So developers mostly don’t interact directly with them, unless you are writing custom components and write a renderer yourself.

But sometimes it could be handy if we could create some kind of interceptor for the renderers methods so that we could have

  • Generic logic for component-based security
  • Retrieve validation info (like required, max size) from Beans so that information isn’t defined multiple times.

That is what Jerry and Valerie provide for you.

Origin

The first RendererInterceptor is committed some 10 years ago within the MyFaces-Extensions-CDI project (ExtVal). A set of useful extensions for Java EE programs covering CDI, Bean Validation, and JSF.

With the RendererInterceptor you have a before and after method for every major method in a Renderer which is decode, encodeBegin, encodeChildren, encodeEnd and getConvertedValue.

About 3 years ago, I extracted the RendererInterceptor concept from ExtVal to become Jerry and rewrote it to have a deep integration with CDI and target it exclusively to JSF 2.x. The Validation extensions parts for Bean Validation were bundled into Valerie.

That way, the most powerful code from ExtVal could be used standalone and Jerry could become the heart of the Declarative Permissions based framework Octopus for the JSF component security.

Now, a new rewrite is performed to bring it within the Atbash project family and restrict its usage to Java EE 7 (and later) using the CDI 1.1 features. This is the new release version 0.9.0.

The ComponentInitializer is greatly enhanced which I will explain in this blog.

ComponentInitializer

The ComponentInitializer is a specialized form of a RendererInterceptor and can change the JSF component just before it is encoded (HTML is generated) by the Renderer.

This can be handy if you want to perform some cross-cutting concern, so for all JSF components or all components of a certain type (input type) without the need to actually know all these JSF components or even adjust the renderers.

Classic examples are

  • Change the rendered attribute based on the presence of an inner tag to have declarative Component security (This is what Octopus does)
  • Change the look of components, like setting the background color of all required input fields.
  • Retrieve information from bean properties (like @NotNull) and set the required property. That way information is only required on the model classes and doesn’t need to be duplicated on the JSF components (This is what Valerie does)
@ApplicationScoped
public class RequiredInitializer implements ComponentInitializer {

   @Override
   public void configureComponent(FacesContext facesContext, UIComponent uiComponent, Map<String, Object> metaData) {
      InputText inputText = (InputText) uiComponent;

      String style = inputText.getStyle();
      if (style == null) {
         style = "";
      }

      if (inputText.isRequired()) {
         style = style + " background-color: #B04A4A;");

      } else {
         style = style.replace("background-color: #B04A4A;","");

      }
      inputText.setStyle(style);
   }

   @Override
   public boolean isSupportedComponent(UIComponent uiComponent) {
      return uiComponent instanceof InputText;
   }
}


The above example sets the background color of all input fields if they are required. This is just an example and probably you should implement such a functionality using styleClasses so that color can be defined outside the code in CSS.
All CDI beans implementing the ComponentInitializer interface are picked up automatically and applied to the correct JSF components based on the return value of the isSupportedComponent() method.

Due to the enhanced functionality within this version, a ComponentInitializer can be executed multiple times and thus we need to ‘undo’ our changed style in case the component is not required.

Just as in the previous release, by default, the ComponentInitializer is executed only once. When due to AJAX request, for example, the component is rendered again, the ComponentInitializer isn’t executed anymore. This is done to minimize the overhead of the feature.

However, when the component is in some kind of repeatable parent component, the Initializer is executed multiple times. The repeatable constructs detected are <ui:repeat> and UIData constructs like <h:datatable>.
This is required because the information can be different for each row like the case where the input field required property depends on the row (required=”#{_row.field.required}”)
This logic is added in this release and important to know when you upgrade from an older version.

RepeatableComponentInitializer

The new RepeatableComponentInitializer construction in this release is always executed, regardless of the ‘location’ of the component.

A use-case for this situation is the fact that a PrimeFaces table footer is always present, although no pagination is shown (resulting in a thin colored line). With a RepeatableComponentInitializer you can remove this footer (or upgrade to the upcoming 6.2 version where this is fixed by PrimeFaces code.

Setting up

You just need to add the Jerry (and/or Valerie) maven dependency to your JSF application.

<dependency>
   <groupId>be.atbash.ee.jsf</groupId>
   <artifactId>jerry</artifactId>
   <version>${atbash.jerry.version}</version>
</dependency>

And you are ready to go.

Some more information can be found in the user manuals for Jerry and Valerie.

When you have an application using an older version of Jerry and/or Valerie (0.4.1 and older) you can use the code within the Atbash migrator project to help you convert the import statements, dependencies and JSF namespaces to the new Atbash values.

Conclusion

With the RendererInterceptor you can perform all kind of useful code in a generic way, without knowing or changing the Renderers. The new release has a greatly improved ComponentInitializer execution (detecting repeated structures like <ui:repeat> and <h:dataTable>), the new RepeatableComponentInitializer concept and is part of the ever-growing Atbash projects.

Have fun.


Categories
Testing

Programmatic CDI access and Unit testing

Introduction

There are situations where you need to access the CDI system programmatically, instead of using annotations like @Inject

  • You want to retrieve a CDI bean within a context (class) which isn’t CDI-aware.
  • It is easier to retrieve an optional or multiple beans programmatically instead of using Instance.

Since CDI 1.1 (Java EE 6), this can be easily achieved by using

CDI.current();

The programmatic access is most useful if you are creating a library/framework or some reusable piece of functionality. But I guess everyone who creates more than 1 application is in the situation where things can be reused.

This blog shows the equivalent programmatic constructs but most importantly, how you can unit test your bean in those cases (no CDI container needed!)

Optional CDI bean

An optional bean is interesting in the situation where you define some basic functionality but in case the developer defines a CDI bean implementing the interface, that custom developer logic is executed.

public interface SomeInterface {}
// with classic injection
@Inject
private Instance<SomeInterface> optional;

   // Within a method
   if (!optional.isUnsatisfied()) {
      optional.get();
   }
// programmatic
// Within method
Instance<SomeInterface> instance = CDI.current().select(SomeInterface.class);
instance.isUnsatisfied() ? null : instance.get();

Multiple beans

Within a Chain of Responsibility pattern or the situation where you can have multiple add-ons which perform some logic in a certain situation, are the ideal situations for having multiple CDI beans implementing an interface.

// with classic injection
@Inject
private Instance<SomeInterface> addonInstances;

   // Within a method
   List<SomeInterface> addons = new ArrayList<>();
   addonInstances.iterator().forEachRemaining(
      addons::add
   );

// programmatic
// Within a method
List<SomeInterface> addons = new ArrayList<>();
for (SomeInterface addon : CDI.current().select(SomeInterface.class)) {
   result.add(addon);
}

Sending Events

One of the nice features of CDI is the ability to sends events between consumers and producers without the need of registering the consumers with the producer for example.

Producing the Event can be done using

// with classic injection
@Inject
private Event<Payload> payloadEvent;

   // Within a method
   payloadEvent.fire(new Payload());
// programmatic
// within a method
CDI.current().getBeanManager().fireEvent(new Payload());

Unit Testing

Now that you have used some CDI bean retrievals in a programmatic fashion, what happens when you execute a unit test?

java.lang.IllegalStateException: Unable to access CDI

When running with plain Java, without any CDI container, you get this message because the API doesn’t contain an implementation, only the specification of the behavior.

You can of course switch to integration testing, where you launch a proper CDI container. But you can, of course, stay with your basic unit testing and have a simple, minimalistic Cdi container implementation (which is by the way not very difficult to create)

Suppose we have following code

public SomeInterface readOptionalInstance() {
   Instance<SomeInterface> instance = CDI.current().select(SomeInterface.class);
   return instance.isUnsatisfied() ? null : instance.get();
}

And we like to test this piece of code then the optional bean is not defined with something like this

@Test
public void readOptionalInstance_NotPresent() {
   Assert.assertNull(viewBean.readOptionalInstance());
}

We need a simple CDI implementation. This is provided by the be.atbash.util.BeanManagerFake class, available in the tests artifact of atbash utils-cdi.

<dependency>
   <groupId>be.atbash.utils</groupId>
   <artifactId>utils-cdi</artifactId>
   <version>0.9.0</version>
   <classifier>tests</classifier>
   <scope>test</scope>
</dependency>

<dependency>
   <groupId>org.mockito</groupId>
   <artifactId>mockito-core</artifactId>
   <version>2.13.0</version>
   <scope>test</scope>
</dependency>

The CDI fake container (as in not real implementation, maybe not the correct term in the test concepts Dummy/Fake/Stub/Spy) is using Mockito underneath, so that is also a dependency we need to add to the project.

The test can then be adapted as follow

private BeanManagerFake beanManagerFake = new BeanManagerFake();

@After
public void cleanup() {
   beanManagerFake.deregistration();
}

@Test
public void readOptionalInstance_NotPresent() {
   beanManagerFake.endRegistration();
   Assert.assertNull(viewBean.readOptionalInstance());
}

We can instantiate the BeanManagerFake as a regular bean. Important here is the deregistration method after the test is finished. It is the idea to keep the fake CDI container between tests alive but only clear the contents. In the current version, the container is also unset which makes it necessary that the beanManagerFake variable is an instance variable (and not a class variable)

With the endRegistration method, we signal that all configuration of the CDI container has taken place and that the operational modus can start. It can give some instances of interfaces if needed as in our test example.

Here we didn’t register anything, so we get a null back.

This is updated test class which contains also a test in the case we specify an instance in the CDI container.

@RunWith(MockitoJUnitRunner.class)
public class ViewBeanTest {

   private ViewBean viewBean = new ViewBean();

   @Mock
   private SomeInterface mockClass;

   private BeanManagerFake beanManagerFake = new BeanManagerFake();

   @After
   public void cleanup() {
      beanManagerFake.deregistration();
   }

   @Test
   public void readOptionalInstance_NotPresent() {
      beanManagerFake.endRegistration();
      Assert.assertNull(viewBean.readOptionalInstance());
   }

   @Test
   public void readOptionalInstance_Present() {
      beanManagerFake.registerBean(mockClass, SomeInterface.class);
      beanManagerFake.endRegistration();
      Assert.assertNotNull(viewBean.readOptionalInstance());
      Assert.assertTrue(viewBean.readOptionalInstance() == mockClass)
   }
}

You can see that we can define a mock (with the @Mock of Mockito) as a bean within the CDI container with the registered bean. We supply the instance and the type to which this instance must be bound. Within CDI, an instance can be bound to multiple class instances like the class itself, the interface, Object.class etc …) This is also possible with BeanManagerFake as the second parameter of the registerBean method is a varargs with all the class values.

And if you run the above test, you will see they are all green, so we, in fact, get the exact instance of the CDI bean (here the mock) back as the return value of the method.

Of course, when you have very complex Cdi constructions, it is better to test them in a real CDI container. But if the focus is on the business logic, the simple CDI container for testing will do.

Code

The code of BeanManagerFake is available in the Atbash utils GitHub repository and artifacts are on Maven Central.

Conclusion

Using the programmatic interfaces of the CDI container is easier in those cases where you need to retrieve optional or multiple CDI beans. And of course in the context where the dependency injection isn’t available. And with the help of the BeanManagerFake, a simple CDI container for testing, Unit tests are possible which make is easier then to set up a full blown integration test with a container.

Have fun.

Categories
Security

Java EE Security API integration with Octopus

Introduction

The Java EE Security API (JSR-375) goal is to enhance the security features of the Java EE platform and to make sure that no custom configuration of the application server must be updated anymore when you want to use for example hashed passwords stored in a database table.
It was released together with Java EE 8 in September 2017 and one of the main concepts which are defined is the IdentityStore which validates the user credentials (like username and password) and retrieves the groups (the authorization grants) the user has.

The Octopus framework is mainly targeted to authorization features like declarative permissions useable for JSF components (with a custom tag) or annotations (to protect EJB methods for example). There are many authentication integrations available like OAuth2, OpenId Connect, KeyCloak, CAS server and custom integrations for database usage to name a few.

Since v 0.9.7.1, released on 27 December 2017, it is possible to integrate the IdentityStores from JSR-375 within Octopus and most of all, it runs also on Java EE 7.

The demo code can be found in the Octopus demo repository.

Project setup

The JSR-375 integration is defined within a Maven artifact specifically created for this purpose,

<dependency>
    <groupId>be.c4j.ee.security.octopus.authentication</groupId>
    <artifactId>security-api</artifactId>
    <version>${octopus.version}</version>
</dependency>

Together with the dependency for JSF on a Java EE 7 server,

<dependency>
    <groupId>be.c4j.ee.security.octopus</groupId>
    <artifactId>octopus-javaee7-jsf</artifactId>
    <version>${octopus.version}</version>
</dependency>

they can be found in the Bintray repository

<repository>
    <id>Bintray_JCenter</id>
    <url>https://jcenter.bintray.com</url>
</repository>

These are the other dependencies which we need

  • Java EE 7 (Provided) all the features of the Java EE 7 platform
  • PrimeFaces (Compile) The JSF Component library
  • Deltaspike (Compile/Runtime) Required dependency of Octopus but set as provided within Octopus so it is easier to specify the version you want to use within your application
  • Soteria (Compile) JSR-375 implementation and required since we are using a Java EE 7 server.
  • H2 database (Runtime) Our database where we want to store hashed passwords.

Security config

In this example, I want to show you the usage of a JSR-375 defined IdentityStore and a custom one.

The default defined IdentityStore is the Database one which stores the passwords hashed. It can be configured by putting an annotation on a CDI bean.

@DatabaseIdentityStoreDefinition(
        dataSourceLookup = "java:global/MyDS",
        callerQuery = "select password from caller where name = ?",
        groupsQuery = "select group_name from caller_groups where caller_name = ?",
        hashAlgorithmParameters = {
                "Pbkdf2PasswordHash.Iterations=3072",
                "Pbkdf2PasswordHash.Algorithm=PBKDF2WithHmacSHA512",
                "Pbkdf2PasswordHash.SaltSizeBytes=64"

        }
)

The datasource is defined within the DatabaseSetup class, which ensures the correct tables are created and filled with a few credentials.

This @DatabaseIdentityStoreDefinition is placed in our demo on the CDI bean which defines the second IdentityStore which is consulted when the database store didn’t contain the username we specified.

This custom store is created by implementing the interface javax.security.enterprise.identitystore.IdentityStore and override the validate() method.

Here we check if it is a certain fixed user and if the correct password is supplied. If so, it returns a few groups. Of course, you can write any kind of logic in these custom stores when the default ones don’t fit your needs.

Authorization

JSR-375 and Java EE in general, expect that each user has some groups defined in the external system which are then converted in roles of your application.

Octopus can also work with roles but one should use permissions because they are far more powerful. It has very powerful permission support like named, wildcard and domain permissions.

The groups of the user are interpreted as follows:
– The group is converted to a role with the same name (for the case you want to work with roles within Octopus)
– The group is converted to a named permission.
– The group is converted to a set of permissions by a CDI bean implementing the RolePermissionResolver which needs to be supplied by the developer.

This last option is probably the best and most powerful way to convert a group to a set of permissions and thus getting the maximum out of the features of Octopus.

No full integration

The described solution here is to integrate the IdentityStores of Java EE 8 (JSR-375) into the Octopus framework. It does not use the JASPIC as the underlying mechanism as JSR-375 describes, nor is there any integration with the other security features of Java EE like @RolesAllowed.

Java EE 8

And your application, like the demo, will be ready to convert to Java EE 8 with a minimal amount of effort. The only thing you need to do is take the Java EE 8 dependency (instead of the Java EE 7 one) and remove the Soteria dependency.

There will be no other changes required to make your application run on Java EE 8 and make use of all the features in that latest release.

Conclusion

With the Octopus framework, you have today already the most powerful authorization features available. And by using you are preparing yourself for the future when Java EE also has the authorization features available which are planned within the Java EE Security API.

Have fun.

Categories
Configuration

First release of Atbash Configuration project

Introduction

Although configuration is important and essential in any application, there is no real standardization available today.

There were several attempts to create a standard around it so that each application could read his parameters in a consistent way. But as of today, there is no final standardization, nor within Java SE, not within Java EE.

Since it is so important, The Eclipse MicroProfile project created a specification for reading parameters in their Micro-services architecture. And it was almost the first thing they did (which highlights the importance they gave it). That work is now continued under the wings of the JCP (as JSR-382) so that it can become a real standard within Java SE and Java EE.

Instead of using other frameworks and libraries which have support for reading configuration, I wanted to switch to the MicroProfile Config project. Because I wanted to be prepared for the feature but encountered a few issues.

Short version

Adapted the code of MicroProfile Config API and Apache Geronimo config to Java 7 and added my own extensions which compose Atbash Config.

The Maven artefacts are available on Maven Central and the user manual is here.

My issues with MicroProfile Config project

Issue is a heavy term, my requirements are not (yet) available within the Config project but the good thing is that they are planned within the JCP specification work.

I want to read configuration parameters

  1. With Java 7
  2. For any Java EE project, not limited to Eclipse MicroProfile applications.
  3. Use single artefact which contains the configuration parameters for different environments embedded in it (within different files)
  4. Use YAML structured configuration files.

And that is not possible for the moment because

  • The MicroProfile Config project is build using Java 8 code structures. So it is not possible to run it in a Java 7 environment.
  • The Apache Geronimo Configuration project implements the API and is a very good candidate to use in my Java EE programs. Because it is created as a standalone project (not as part of a server like other implementation such as Payara, KumuluzEE, WebSphere Liberty or others) and thus you can add this dependency to any Java EE application. But configuration file name is still related to MicroProfile (/META-INF/microprofile-config.properties).
  • MicroProfile Config project has support for overruling properties by specifying them in the environment or as JVM system parameters. But there is no feature to define multiple files nor the ability to define multiple files within the artefact for each environment.
  • Only properties files are supported. And when you have larger projects, it can be handy to use a YAML structure so that it is more clear which properties are closely related.

Solution

Adapt MicroProfile Config API and Apache Geronimo Configuration.

Except for the first issue, support for Java 7, my own configuration extension could be a solution for my requirements. So I had no other choice than to copy the code and adapt it. And although the code is licensed under the Apache OpenSource license (which allows me to do this) it doesn’t feel right. So I want to thank explicitly all those committers that created the code for their wonderful work and I also made explicitly a reference within the notice file and documentation.

Atbash configuration extension

The extension consist of a custom implementation of the ConfigSource interface. That way I’m able to register another source for reading configuration parameters and fulfill my other 3 requirements.

– Implement the BaseConfigurationName interface and define the class also for the ServiceLoader mechanism. Now I’m able to use any filename like demo.properties or demo.yaml when the value demo is specified as the base name.
– By specifying the environment with the JVM system parameter -S, I can add a prefix to the filename and supply additional or override parameters for a certain environment
– YAML file support is implemented with the use of Snakeyaml where the file is converted to key-value pairs.

For more information, you can read the manual.

Getting started

There are 3 ways how you can use the Maven artefacts

1. Use plain MicroProfile config with Java 7.

Add the adapted Geronimo config code to your project

<dependency>
   <groupId>be.atbash.config</groupId>
   <artifactId>geronimo-config</artifactId>
   <version>0.9</version>
</dependency>

2. Use the Atbash configuration extension with Java 7

You need the Geronimo config and atbash config project

<dependency>
   <groupId>be.atbash.config</groupId>
   <artifactId>geronimo-config</artifactId>
   <version>0.9</version>
</dependency>

<dependency>
   <groupId>be.atbash.config</groupId>
   <artifactId>atbash-config</artifactId>
   <version>0.9</version>
</dependency>

3. Use the Atbash configuration extension with Java 8

In this scenario, you don’t need the adapted code and can use the regular implementations

<dependency>
   <groupId>org.apache.geronimo.config</groupId>
   <artifactId>geronimo-config-impl</artifactId>
   <version>1.0</version>
</dependency>

<dependency>
   <groupId>be.atbash.config</groupId>
   <artifactId>atbash-config</artifactId>
   <version>0.9</version>
   <exclusions>
      <exclusion>
         <groupId>be.atbash.config</groupId>
         <artifactId>microprofile-config-api</artifactId>
      </exclusion>
   </exclusions>
</dependency>

Conclusion

MicroProfile Config is the first real standardization around reading parameters for configuration. They have built their implementations on top of Java 8.

So when you need a general usable library with Java EE 7 (which is using Java 7 as a base version), you can use the Atbash config code (adapted from the MicroProfile Config API and Apache Geronimo config as implementation) which has a few handy extensions.

This makes you future proof at the time JSR-382 will be adopted by the different application servers.

Thank you for reading until the bottom of this blog entry and have ave fun.

Categories
Security

Release of JSR-375 extension for JWT based authentication/authorization with JAX-RS

Introduction

Since the release of Java EE Security API (JSR-375) specification, there is an easy, uniform API to define authentication and to some extend authorization.

With this specification inplace, there will be no need anymore to change Application server specific configuration files within any Java EE 8 compliant server.

Another good thing is that Soteria, the RI of this JSR-375 specification can also be used on most of the Java EE 7 servers.

The downside is that only the ‘classic’ mechanisms using Basic, Digest and Form authentication using LDAP or Database based validation is standardized.
The reasons for this were time (specification was under time pressure since it needed to be included in Java EE 8) and usage of external libraries (and license issues)

The usage of tokens is not standardized but can be created since the API is already available within the specification.

JWT based extension

The above observations lead me to create such an extension which is able to retrieve a JWT from the header within a JAX-RS call and authenticate/authorize the ‘remote user’ using the JSR-375 defined APIs.

If you want to skip the (longer) explanation in this blog entry, you can go straight to the GitHub repository with the compact instructions to get started.

When you are not familiar with JSON Web Tokens (JWT), have a look at the site jwt.io which explains it to you very nicely.

Since the JWT specification only defines the ‘structure’, as a developer, you are free to specify the content of the JWT Payload.

This variability leads to the following implemented flow:

– Extension is responsible for retrieving the token defined with the authorization header (through a custom HttpAuthenticationMechanism)
– Control is handed over to a JWTTokenHandler which needs to be implemented by the developer to verify if the JWT is valid (signature, timings, … check) and extract authentication and authorization information.
– This information is communicated to the low-level layers of the security API so that ‘request’ is now considered as authenticated and that roles can be verified.

JWT payload structure

The JWT token is expected as part of the authorization header with the bearer marker as in the following example:

Authorization:Bearer eyJraWQiOiI3NGYyNDYxOS1kNzIwLTQ1YWQtOTk2Yy0zNWNkNzNiNDdmZmQiLCJ0eXAiOiJKV1QiLCJhbGciOiJSUzUxMiJ9.eyJzdWIiOiJTb3RlcmlhIFJJIiwicmVhbG1fYWNjZXNzIjp7InJvbGVzIjpbInVzZXIiLCJtYW5hZ2VyIl19LCJleHAiOjE1MTAzNDgxMTMsImlhdCI6MTUxMDM0ODA4M30.Bk37fPLgymuLZfLq_hdxt94PDRwNAkPkoajegaLLMrsuCCeKEb5DRXcpT9kUyrwEzSFamg_19Y7IT-0utDw4yd_rEzq7lIG8UFc8qnoYi9692Es_sqzwu64x0dM1ODOAHYEPFhIXPo2-nxquYyayMJI5PN4WlTPrRgoFCkY6saxJGzAGlfQIqH3ozaMvEJn1GK3uj1_zglv2HHK1t8lliazRkmRI-p1k9A_HCnnpChb9czpUP_wXRN4HxbADldS5sM7lgsFeLZDB4oewAh9sTXiseH7HnbPfmQKF18vb9Vejc9XzIGf0CrSOf6yVTyYDChYhI1eB5z6Wv33ofFgbPg

If you decode the payload from the above example (yes payload is unprotected but safe due to the signature) you have the following information:

{"sub":"Soteria RI",
"realm_access":{"roles":["user","manager"]},
"exp":1510348113,
"iat":1510348083
}

The sub claim defines the authentication information (who is it), the realm_access defines the groups/roles the ‘user’ has (what is he allowed) and exp and iat can be used to have a token which expires and thus replay attacks are excluded.

As I already mentioned, the payload structure is not defined by JWT, nor by Java EE Security API (as tokens are not tackled yet).

But another organization, Eclipse MicroProfile, also created their specification around authentication within micro-services. Have a look at this post which goes deeper into the subject.

So why not using their recommended claims as it will become probably the (defacto) standard.

The example in the GitHub repository implements such an MP JWT payload (also using RSA keys as mentioned within the specification).

Setup

Have a look at the readme  for all the details on how you can use the extension.

In short, this is all that you need to do

Add the dependency

You need to add the Maven dependency to include the code for the JWT extension for jsr375

<dependency>
   <groupId>be.atbash.ee.security.jsr375</groupId>
   <artifactId>soteria-jwt</artifactId>
   <version>0.9</version>
</dependency>

Implement the be.atbash.ee.security.soteria.jwt.JWTTokenHandler.

It is responsible for loading the RSA keys and verifying if the JWT is valid (Signing and time restriction for example)
The implementation is also responsible for retrieving the user name and the groups from the JWT payload and supply them to the system. They are used to construct the required principal and role info.

Conclusion

Usage of tokens, like JWT and OAuth2 tokens, is not included in the Java EE Security API specification for the moment. But the interfaces are already in place to extend to the system in any way you like. Those are used to create these extensions so that you can start using them already today, On Java EE 8 and Java EE 7!

Have fun.

Categories
Security

Session Hijacking protection with Octopus framework

Session Hijacking

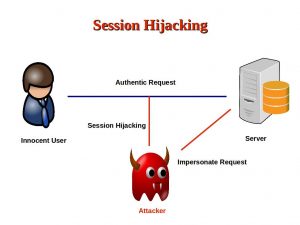
What is Session Hijacking? Most Web applications store information of the user ( the classic example is the shopping basket) in the HTTP session. But also the basic user information. So, whenever someone else knows the ID of the session, he can impersonate the victim and act on behalf of him/her.

The following image shows the attack (image by A. Mitra)

Octopus protects

But there exist a few techniques to identify if such an attack is in progress for a certain session. And this technique is implemented within the Octopus framework (from v0.9.7 on)

You don’t have to do anything specific to activate this features, it is on by default.

When such an attack is detected, the attacker gets a blank page with the message that access was denied due to a Session Hijacking attack detection. But also the actual victim can be informed of the attempt to take over his/her session.

See the following short video to see the feature in action.

Youtube video

The code used to create the video is on GitHub.

Have a look at the parameter session.hijacking.level to configure the feature in case you have issues or want to deactivate it.

Conclusion

With the Session Hijacking protection, Octopus tries to make the applications as safe as possible. It is only one of the security features it has. You saw also in the video that the session ids are changed when the user logs on and logs off, just as OWASP recommends it.

Have fun.

This website uses cookies. By continuing to use this site, you accept our use of cookies.  Learn more